DIY-six-pack pendant lights

Nate Berkus just featured the talented artist and life-long upcycler, Bao-Khang Luu of Relevedesign.com on his show today. Relevé Design transforms commonly discarded materials into new unique lighting, home accessories, and furniture. By injecting a hefty dose of design into upcycling, he makes beautiful and desirable objects that happen to be eco-friendly for the home.

Bao transforms discarded plastic six-pack rings  into modern, bold pendants while turning trash into one BIG BRIGHT IDEA. The designs are inspired by George Nelson’s iconic Bubble Lamps with a more modern eco twist. The plastic rings are joined together on used plastic take-out lid frames, old soda cans, twist ties and then are connected by a cord covered in a sleeve knit from plastic shopping bags. A beautiful diffuse light is emitted from energy-efficient LED’s, which let off little to no heat {which could melt the plastics}and have a long-lasting bulb life.

Relevé Design offers collections in limited edition. Each collection focuses on one type of discarded material upcycled into one type of object.  Check out Relevé Design’s blog he gives a great DIY tutorial. on how to make your own six-pack pendant light.  On my list of things to make this spring, share your designs with us!

The Well Seasoned Cast Iron Pan

Cast iron pans, one of the few pans that will last a lifetime. I received my great Aunt’s pan when I moved into my first apartment. It was old well seasoned and she said” You will cook many meals in this single pan, ENJOY”! I thought what will I do with this old iron pan, not knowing at the time the true GEM it was and still is with another 30 years of good use! Truly this pan could tell many cooking stories and is more than 75 years old!
All they need is a little TLC!

For best results, rinse the pan with hot water immediately after cooking. If you need to remove burned-on food, scrub with a mild abrasive, like coarse sea salt, and a nonmetal brush to preserve the nonstick surface.

Use a few drops of a mild dishwashing soap every once in a while.

If the pan gets a sticky coating or develops rust over time, scrub it with steel wool. To prevent rust, dry the skillet thoroughly {I generally wash and dry on the stove on medium heat until the water evaporates}and lightly coat the cooking surface with coconut oil. Cover with a paper towel to protect it from dust.


Re-season periodically apply a thin coat of Virgin Coconut Oil to the pan inside and out.


Place aluminum foil or old cookie sheet on the bottom rack of oven to catch any drippings.
Place the pan upside down on the top rack of the oven
Set oven to 350 and bake for 1 hour
Let cool and ready to use again!

Repurposed Wallpaper sample books makes beautiful gift wrap!

Wallpaper sample books are a great source to get beautiful FREE craft paper. The sample books have hundreds of different patterns, colors and styles. The key is that these books are often thrown away once the wallpaper manufacturer has updated and issued their newest designs. I recently got 5 books from my local paint supply store for FREE and the patterns are wonderful and the perfect twist for all my holiday gift wrapping. No more buying gift wrap for me! In addition to gift wrap, wallpaper is a great source for scrap booking, shelve liners, greeting cards and envelopes and ornaments. Share your thoughts on what you would do with your wallpaper, just call your local paint store who carry wallpaper and I’m sure they would love to share.

these gifts were wrapped using everything I had in the craft box

colored duct tape{ they have wonderful colors for crafts} and washi paper tape

handmade stamped gift tags

gold tulle and paper mache pomegranate

The easiest way to remove the sheets is to use a matte knife and score the edge.  Your gifts will be well wrapped and offer a wonderful color assortment under the tree!

DIY- How to make a garage dollies


Fall is the time to reorganize the garage and  get all my leftover garden supplies out-of-the-way for the winter.  I always have half filled bags of potting soil, compost, limestone, grass seed, corn gluten and many others.  I have been told that if the bags are sealed tightly (keeping moisture and air out), the products will last another season so out with the duct tape for winter packing.  I also found that the bags are often still very heavy so I have made some wonderful dollies to help ease the back pain.  These are an easy weekend project and can be made to your own measurements and only cost $5 for the casters; everything else was leftovers form other projects!
Supplies:

  • 3/4″ plywood  cut 23 X 19 or whatever plywood you have extra
  • 4 1 1/2 in. Rubber wheel swivel plate casters (rated for 60 lbs. each) some plates come with screws $5.00
  • 16 3/4″ screws (needed if not included with the plate or too long)
  • drill and drill bit
  • circular saw

You can make the dollies any size you wish I just happen to have 3 extra pieces (23 X 19) from another project and they  were perfect for my size garden buckets.  I first edged the 4 corners of each plywood with a circular saw, just in case I ever would run into the edge which would be very likely.

Next I placed the casters near the edge of each corner about 1 inch from each side and used a sharpe to mark the holes.  I predrilled holes with 3/16 drill bit which was the size I needed for the screws.  Screw in the 4 screws for each caster and you can paint if wanted I just left mine natural.

These are a great back savers for me and a great easy way to move heavy gardening supplies around!  I already have 3 and would love more, let me know your thoughts and any tips you have!

The Easiest DIY Placetags for Thanksgiving

Alison Abbott fame creater of GreenwithRenvy, is one of the most  talented people I know.  Her blog is full of wonderful unique ideas and well worth a visit.  Her fun whimsical placetags are perfect for my table decor this year and will add a playful twist to the traditional setting.
Thanksgiving is by far my favorite holiday. Family, friends, great food and my birthday, all rolled into one celebration. What could be better? But cooking for a lot of people can be stressful. Here are two of my favorite DIY placetags projects to make your life a little easier.


placetags pinecone label
placetags pinecone
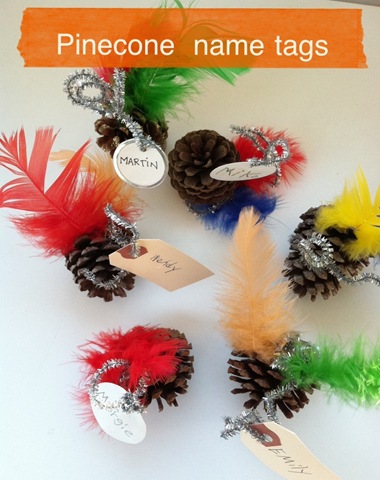
If you have kids around that like to be part of the action, get out your craft supplies. I loved making these with my nephew, and we keep them from year to year, adding in when necessary. Everyone always loves searing for their name at the Thanksgiving table. You’ll need:

* pinecones
* feathers
* tags-office supple stores are great for these, or just cut circles out of card stock
* markers or pencil
* pipe cleaners

Make out all the name tags. Twist pipe cleaners around the pinecone and attach name tag at the end. Glue in a few feathers and let dry. They look like cute, little turkeys when your done!


placetags leaf
For this even easier idea, gather up some leaves from outside and wipe them down with a moist towel. It works better if the leaves still have a little moisture in them, so they don’t crumble. And they don’t have to be brown. The changing colors of leaves can make for a festive table depending on your decor. Place the leaves in a heavy book overnight {if you have the time} to flatten them out. Decorate with your favorite metallic pen.
The holidays needn’t be stressful. Stop by next week for some cranberry classics!

Thanksgiving table arrangements- quick easy designs

Floral arrangements can set the stage for any table setting. They are quick easy ways to dress up any occasion. I have pulled together some of my favorite center pieces for Thanksgiving which have a beautiful graduation of color, a variety of materials and create a strong horizontal line design. These arrangements have a variety of textures, forms, and create a vibrant rhythm throughout the design.  Most of the designs have a variety of mums, roses  calla lillies, fruits, gourds, roses and most materials were found at any good grocery store.

Happy Thanksgiving!

DIY-grow at home mushroom kit!


I came across this kit in Whole Foods the other day and was intrigued by the concept.  The kits consists of  a prepackaged box with 100% recycled coffee grounds and will produce 1.5 lbs of tasty gourmet oyster mushrooms.

It is basically 3 easy steps: cut open the interior bag, mist and harvest in 10 days.  The ingenious idea came from 2 business school graduates who experimented with the concept{of taking recycled coffee grinds and grow mushrooms} and made their first batch in a small bucket in their fraternity.   The rest is history and the Back to the Roots company was formed.  Besides the fact that the kit is a great gift, the company is promoting sustainability, healthy communities, local growth,  as well as the donation of kits to schools to help in their educational development.  These kits are a must have for your holiday shopping!

Frugal Friday-laundry lavender sachets

There is nothing better smelling than a fresh load of laundry right from the dryer. I have stopped using  dryer sheets and have been searching for a sweet-smelling solution. I have been growing lavender for about a year and thought let’s make dryer sachets and what a difference 3 sachets can make……

supplies:

2-5″ squares of fabric( I used some of my husbands old dress shirts)

¾ cup lavender buds {per sachet}-store bought or home-grown

straight pins

iron/ironing board

Cut 5″ squares you need 2 for each sachet. Sew a set of {2} 5″ squares together on 3 sides and use the edge of the presser foot as a guideline.  Leave the 4th side open to fill with lavender.


Trim 4 corners at an angle.
Turn inside out and press flat. On the open end turn in 1/2″ and press, easier to sew closed after you add the lavender.

Since these are going in the dryer I like to make sure all seams are secure, so I stitch around the right side again so it makes a french seam.

add 3/4 cup of lavender buds to sachet.  Pin open end and stitch closed.

Your laundry will be sweet smelling from now on.  Do you have some laundry secrets to share?

Garlic- “The stinking rose” how to grow part 1

The Fall is one of the best times to prepare your garden for spring bulbs. Garlic is the one bulb people forget about, but an easy one to grow yourself and also a great insect and deer deterrent.  Did you know that the bulk of garlic is imported from China and I would guarantee that it has been chemically treated so it will not sprout when exported to the US.  There is an entire world of exotic garlic ready to grow in your own garden, but you have to plant now so you can enjoy it next summer.

Garlic needs a cold dormant period to produce full heads, so you need to prep your garden on a chilly fall day or first frost. I generally target Columbus day, but this year we had to wait a couple of weeks because the weather in New England has been so warm.  Garlic is very hearty and won’t grow well unless subjected to harsh winter weather conditions.

Prep your garden accordingly:

  • your garden should be prepared like any vegetable garden with a lot of organic matter ,well-drained and in full  sun. {if you soil tends to be very acidic add some lime}.
  • buy garlic from the local farmer or bulbs from a garden supplier online where you can purchase a variety of exotic flavors {which I prefer}.
  • remove the paper outer covering, and separate the individual cloves. Each clove should produce an entire new bulb.  I use the handle of any small garden tool to make the holes.
  • plant 2″ deep and  4-6″ apart with the root end at the bottom and the pointy end up.
  • Garlic is very winter hardy but should be heavily mulched to prevent heaving.  Add a thick layer of leaf mulch and it will also encourage worm activity.
  • don’t be alarmed if some bulbs start to sprout right after you planted them if you get a warm day, just let them be!

See you in the Spring for part 2!

DIY-etched wine glasses

I love etched glassware especially stemless wine glasses and wanted to make a set with individual designs. This is a great hostess gift with a bottle of wine or a nice gift to yourself!  So out come the crafts and quick easy steps on how to make your own.

Supplies:

  • stemless wine glasses from Pier 1 Imports $2.00 each
  • paint brushes: #8 and #0
  • rubber gloves
  • protective glasses
  • newspaper
  • contact paper any craft store
  • assorted design hole punches from Mcgill (circles,diamonds,swirls,large dots; flowers are a bit tricky because if each petal does not adhere, cream will get under the petal and the pattern will not be exact. I use shapes that don’t have a lot of delicate detail.
  • Amour Etch cream-any craft store
  • bucket of water and sponge

Step-by-Step tutorial:

  • put newspaper done to protect your surface
  • wash glasses either in dishwasher or with rubbing alcohol
  • make your design punch cut-outs on the contact paper you will need 9-12 of each design per glass

  • place the cut-outs on the glasses and space according to your design
  • put on your rubber gloves and protective glasses.
  • dip the larger paint brush in the etch cream and  cover  the cut-out design with a thick coat.  Make sure you only cover the cut-out area, if the etch cream gets on the other part of the glass by mistake wipe off ASAP or the cream will start to adhere.  If that does happen just put another cut-out over the mistake and add more etch cream.
  • make sure you put a thick cover on the design, this is the most important step or the design
  • the directions say to leave on  5 minutes, I leave it on at least 15 minutes and often 20 minutes.
  • submerge the glass in water and sponge off the cream, I have often time reused the cutouts again on new glasses.
  • wash the glasses again in the dishwasher

Enjoy a nice Chardonnay with dinner!